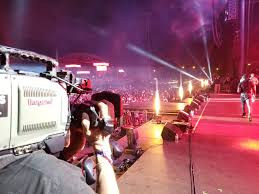
TOP TIPS FOR FILMING EVENT VIDEO WHILE ALSO USING PHOTOGRAPHY
Capturing event video and photography at the same time as a solo producer can be tough, but preparation and planning make it possible. We’ve compiled this list of top tips for filming event video while also using photography to help you get the most out of your resources when on location.
Video and photos captured together make for a double paycheck right? Seemingly yes, but so many mistakes can arise when a single person attempts to capture film and photos at the same time. This is not to say it is impossible–but, to keep your sanity, follow the steps below.
USE YOUR STRENGTHS
As a videographer, you should already have a solid idea as to what you are and are not capable of. Use your strengths to your advantage and capture photos and video that plays with those strengths. If you’re not great at photography, focus more on video. If you’re better at photos, focus more there and less on the latter.
CAPTURE VIDEO IN MOTION
As you determine when to switch between video and photography, consider the general rule — video loves motion, photos love still life. It may be a little bit more difficult to focus and adjust on the fly, but capturing the motions of the event on video will certainly produce the best footage for the final edit.
Avoid Shaky Footage
Have you ever watched a video and the person filming just couldn’t keep the subject in frame? You probably got so frustrated, you wanted to just give up watching.
This is not the viewer experience you want to give you audience.
Now, shooting handheld footage, in some cases, works really well and can be an effective way to move your audience in an emotional direction.
Unfortunately, when it comes to shooting your business videos, this may not be the best style to take. The fact is, shaky footage looks amateur, and although you may be a beginner, your videos shouldn’t reflect it.
Remember, videos are an important touchpoint with your brand and achieving that clean, professional look in them will build credibility and trust.
No Tripod, No Problem
There are a couple manual techniques you can use to avoid shakiness while shooting your videos:
- T-Rex Arms – Take the camera with both hands, and bring your elbows into your body just under your armpits and the camera close to your chest.
- Human Tripod – Use your surroundings as a place to rest your elbows. Find the ideal height for your shot and spread your legs about shoulder width apart to form the “Human Tripod.”
Stabilizing Gear
Ok, so you have techniques for when you’re on the go with little equipment, but sometimes, you need gear to give you that extra edge. What should you get?
- Monopod – Ideal for almost every scenario, a monopod allows you to move quickly and set up quickly. A monopod is simply a tripod but with only one leg (hence the name monopod). It’s almost like a selfie stick that stands on its own.
- Tripod – This is the most common of all stabilizing gear, and a great tool for all types of situations; Interviews, close-ups, time-lapse just to name a few.
- Gimbal – A mechanical device that gives an object, such as a camera, the ability to rotate around a single axis. In simple terms, it’s a device that allows you to attach a camera and with the right calibration, that camera will stay centered and fixed on a single plane.
Give importance to sound quality
A video is essential to capture the picture of your event, but it’s equally important to care about the sound quality of your event video. Especially when you have a human figure talking on the screen in videos with speech, presentation, anchor hosting, interviews, testimonials, etc. You may choose to add the audio during post-production, but be sure that you are carrying the right equipment to record clear sound bites from the event.
ADD TEXT TO YOUR EVENT VIDEO
Consider adding text to those videos where sound quality fails to deliver the message. A lot of videos are watched on mute these days. In fact, a recent study says that 85% of Facebook videos are watched without sound. Modern-day viewers consume videos passively while commuting to their destination or in public spaces. Adding text to the video is critical since they would help the viewer understand the video in its context in spite of its bad sound quality or on mute.
Set up Your Event Like a Professional Party Planner
If you’re just starting out in event planning, this video will still be really helpful for you as this professional event planner shows you her event set up process for an actual client. Most private events won’t include event staff to help you, so knowing how to successfully set up an event is a skill you’ll need at some point.
Main Takeaway: From production kits to client communication, this event planning video has you covered for all your event set up basics.
How Event Videography Rates Are Determined
First, let’s consider what to expect when budgeting for event videography, how rates work for your event filming. Most videographers or professional event videography companies will charge a base rate such as a “day” rate or a “half-day” rate. This is the bare minimum cost that you can expect for event video production services for a full day, which is 8 to 10 hours, depending on the company or a half-day, which is usually 4 hours.
MULTI-DAY COVERAGE
If you have a multi-day event taking place, you will likely need to budget for a multi-day event videographer to cover your event. While there may be discounts for multiple days of filming, you can generally expect to pay the full-day rate for each day that you utilize event videography services to record real-time footage.
DURATION OF EVENT
For short events, an hourly rate may be more budget-friendly. However, keep in mind that with an hourly rate, you are often required to secure at least 4 hours, and if your event goes over at all, the rate is significantly higher than the standard rate. As such, it is generally best to pay for a half-day even if you believe your event will be less than 4 hours in total length.
KEEP IN MIND
Various factors influence the amount you will pay for event coverage. As you’re budgeting for event videography, keep in mind that the following factors have a lot to do with the total cost of event video production services:
- Location of the event. Filming in major cities may cost more at peak times.
- Date and time of the event. Peak dates, including holidays and weekends, may cost more.
- Editing of final footage. Events that include final footage with customizations, extensive graphics, or another major editing will cost more.
- Special equipment needed for production. Things like drone footage, additional lighting, special audio equipment, or other needs can add to production costs.
- The number of cameras used. Each camera adds resources and increases costs.
- Consulting for the script, talent casting, or storyboarding. Although generally not required for events, additional consulting can add to the total budgeted cost.